-
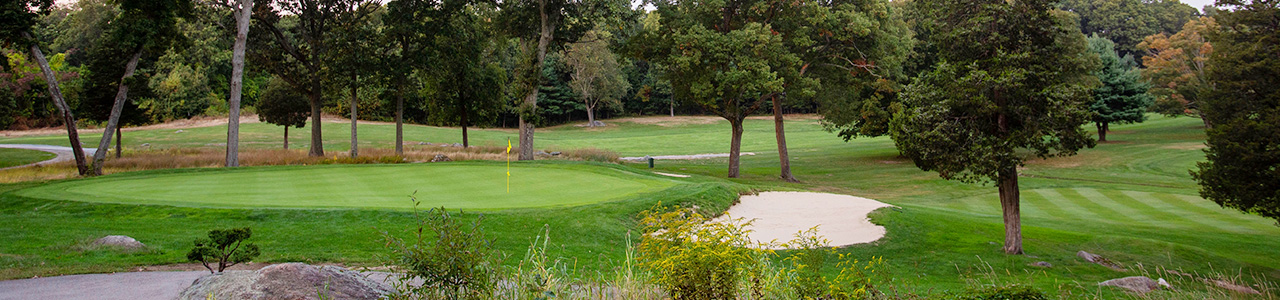
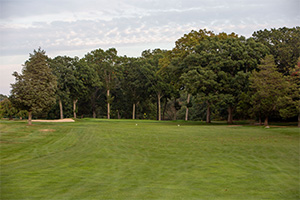
Hole #1
 390 Yards - Par 4
Hole #1 is a fun and challenging starting hole. A generous landing area welcomes a good drive but beware of the stone wall right and the high fescue left. Drives should favor the left side of the fairway as the green is protected on the right side by a large oak. A long, or mid iron is needed for your approach shot to a medium sized green, protected by front greenside bunkers on both the left and right.
Tee Box Distances White 390 yds Blue 380 yds Yellow 337 yds Red 380 yds Green 337 yds -
Hole #2
 423 Yards - Par 4
The second hole, the number 3 Hcp, is a long par 4 with a large fairway. Let it fly! The landing area is wide, but misses to the left will encounter deep rough, and misses right can leave you blocked out by the pine trees. Again, a solid second shot is required to reach the large green which slopes slightly from front to back. Aim point is the large oak behind the green. Missed approach shots to the left can result in out of bounds. Greenside bunkers protect both the right and left side of the green.
Tee Box Distances White 408 yds Blue 423 yds Yellow 326 yds Red 408 yds Green 326 yds -
Hole #3
 320 Yards - Par 4
Hole #3 is the most straightforward hole on the golf course. It is short, but beware of the brook, that runs across the fairway about 230 yards out. A good drive will leave a short approach shot that is all carry to an elevated and significantly sloped green. The green is protected by bunkers on both sides and an overhanging oak on the right. The severe, back to front slope of this green, requires caution in both the approach shot and all putts. Do not miss long, as approach shots that are long, can be nearly impossible to keep on this fast running green.
Tee Box Distances White 312 yds Blue 320 yds Yellow 312 yds Red 305 yds Green 305 yds -
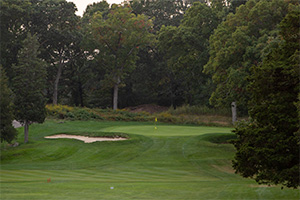
Hole #4
 166 Yards - Par 3
One of the more visually pleasing holes on the course, Hole #4, is a challenging downhill mid iron shot, to a large firm green. The green is protected by large bunkers on the left and right. The green slopes from back to front. Misses left, and misses long, are jail. Watch out for a big number on this hole.
Tee Box Distances White 166 yds Blue 150 yds Yellow 140 yds Red 130 yds Green 133 yds -
Hole #5
 332 Yards - Par 4
The view off the tee is dominated by the undulating fairway and the trees on both sides. This can be a classic risk/reward hole for the long hitter. Bombs away with the driver and you may reach the green. But the landing area narrows and is on an upslope. Beware of Out of Bounds on shots that are over the stone wall on the left. Short iron approach shot should favor the right side of the green that has a significant back to front and right to left slope. Deep bunkers provide protection on both sides. If you’re over the green on this hole you are probably looking at a double bogie.
Tee Box Distances White 332 yds Blue 321 yds Yellow 321 yds Red 312 yds Green 312 yds -
Hole #6
 364 Yards - Par 4
Hole # 6 is a downhill dogleg left. This hole is all about the tee shot. Longer hitters, who can carry the visible hilltop with a draw, will have a short iron approach shot in to a large but challenging green. But be careful as there is water that can come into play for a long drive that fades. A straight drive to the top of the hill will leave a long to mid iron approach that may have to carry over water. Due to the rolling terrain, this hole will test your ability to hit every type of shot. Be prepared for an uphill, downhill, or side-hill lie, and it would be wise to expect some nasty combination of the three. The green is protected by bunkers on both the left and right sides.
Tee Box Distances White 364 yds Blue 382 yds Yellow 304 yds Red 304 yds Green 304 yds -
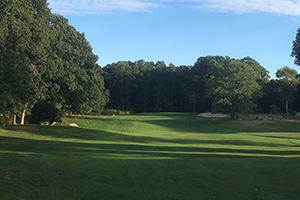
Hole #7
 371 Yards - Par 4
The number 9 Hcp, hole #7, a beautiful hole aesthetically, is a long, but reachable uphill par 4. Your tee shot should be targeted to carry the large fairway bunker on the right, which will leave an uphill mid iron shot, that is all carry to the large green. The landing area for drives short of the bunker is narrow, with the fairway only about 15 yards wide. Your approach shot from this location is all up hill and will require an accurate fairway metal or long iron. The green is large, undulating and a challenge to read. It is protected by a deep greenside bunker on the left and two deep bunkers on the right.
Tee Box Distances White 371 yds Blue 421 yds Yellow 371 yds Red 316 yds Green 316 yds -
Hole #8
 528 Yards - Par 5
Another visually stunning hole is the long, downhill, par 5 hole #8. This hole has it all: fairway bunkers, deep greenside pot bunker, forced carry over water, deep fescue rough and a challenging green. This hole is also all about the tee shot. Your drive should be targeted right of the reachable fairway bunker, but not too far right as the rough area will funnel the ball into the trees. A mid to short iron layup, will get you near the pond that protects the green. There is a large bail out area right of the pond for those wishing an even shorter approach. A solid wedge shot to the large, multi-tiered green is needed for a chance at birdie. The green is large, has a back to front slope, and is a tough read.
Tee Box Distances White 528 yds Blue 485 yds Yellow 485 yds Red 384 yds Green 384 yds -
Hole #9
 417 Yards - Par 4
The number 1 Hcp hole, the ninth is an uphill dogleg right off the tee, followed by a downhill approach to a front to back sloping green. A good drive is required to have a look at the green and should be targeted to the left side of the fairway as close to the top of the hill as possible. Drives to the right side will result in being blocked from a clear approach by trees.
Distance control on the approach is critical to hold the green due to the front to back slope. A solid and accurate downhill mid-iron is required to find and hold on this green, which is protected by bunkers on both sides. A quick stop in the clubhouse for a snack and (OPTIONAL ADULT) beverage will guarantee you’re ready for the back nine!
Tee Box Distances White 417 yds Blue - Yellow 366 yds Red 366 yds Green 366 yds -
Hole #10
 380 Yards - Par 4
Hole #10 kicks off the back nine. This hole plays slightly shorter the second time around but is still a challenge. The generous landing area welcomes a good drive but the stone wall right and the high fescue left are reachable and should be avoided if a birdie or par is to be carded. Drives should favor the left side of the fairway as the green is protected on the right side by a large oak. A long, or mid iron is needed for your approach shot to a medium sized green, protected by front greenside bunkers on both the left and right.
Tee Box Distances White 390 yds Blue 380 yds Yellow 337 yds Red 380 yds Green 337 yds -
Hole #11
 423 Yards - Par 4
The eleventh hole, the number 4 Hcp, plays longer the second time around. A good drive on this long par 4, is necessary to have a chance at par. The landing area is wide, but misses to the left will encounter deep rough, and misses right can leave you blocked out by the pine trees. Again, a solid second shot is required to reach the large green which slopes slightly from front to back. Aim point is the large oak behind the green. Missed approach shots to the left can result in out of bounds. Greenside bunkers protect both the right and left side of the green.
Tee Box Distances White 408 yds Blue 423 yds Yellow 326 yds Red 408 yds Green 326 yds -
Hole #12
 320 Yards - Par 4
Hole #12 again plays longer the second time around. The brook, that runs across the fairway about 240 yards out is still an obstacle to be avoided. A good drive will leave a short approach shot that is all carry to an elevated and significantly sloped green. The green is protected by bunkers on both sides and an overhanging oak on the right. The severe, back to front slope of this green, requires caution in both the approach shot and all putts. Do not miss long, as approach shots that are long, can be nearly impossible to keep on this fast running green.
Tee Box Distances White 312 yds Blue 320 yds Yellow 312 yds Red 305 yds Green 305 yds -
Hole #13
 150 Yards - Par 3
Standing on the front of this tee, you get a real sense of the major elevation change in this hole. Hole #13 is your last chance for a hole in one for this round. Play a solid short iron, high into the sky and watch the ball float downhill to the large firm green. The green is protected by large bunkers on the left and right. The green slopes from back to front. Misses left, and misses long, are jail. Watch out for a big number on this hole.
Tee Box Distances White 166 yds Blue 150 yds Yellow 140 yds Red 130 yds Green 133 yds -
Hole #14
 321 Yards - Par 4
Hole #14 plays slightly shorter on the back, but that brings more hazards into play. The view off the tee is dominated by the undulating fairway and the trees on both sides. Downhill, side-hill and uphill lies, should be expected. This can be a classic risk/reward hole for the long hitter. Bombs away with the driver and you may reach the green. But the landing area narrows and is on an upslope. Beware of Out of Bounds on shots that are over the stone wall on the left. Short iron approach shot should favor the right side of the green that has a significant back to front and right to left slope. Deep bunkers provide protection on both sides. If you’re over the green on this hole you are probably looking at a double bogie.
Tee Box Distances White 332 yds Blue 321 yds Yellow 321 yds Red 312 yds Green 312 yds -
Hole #15
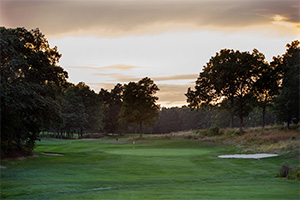 382 Yards - Par 4
Hole #15, a downhill dogleg left, is unexpectedly longer on the back. The back tee brings more trouble into play including the overhanging trees on the left and the pine grove at the top of the hill on the right as well as more of the rolling terrain. Longer hitters can still carry the visible hilltop with a draw for a short iron approach shot in to the large but challenging green. But, they may think twice about trying to cut the corner by going over the trees. A straight drive to the top of the hill will leave a long to mid iron approach that may have to carry over water. The green is protected by bunkers on both the left and right sides.
Tee Box Distances White 364 yds Blue 382 yds Yellow 304 yds Red 304 yds Green 304 yds -
Hole #16
 421 Yards - Par 4
The number 2 Hcp, hole #16, a beautiful hole aesthetically, is also a truly intimidating obstacle. From the back-tee box, it is a long uphill challenge. Your tee shot should be targeted to carry the large fairway bunker on the right, which will leave an uphill mid iron shot, that is all carry to the large green. The landing area for drives short of the bunker is narrow, with the fairway only about 15 yards wide. Your approach shot from this location is all up hill and will require an accurate fairway metal or long iron. The green is large, undulating and a challenge to read. It is protected by a deep greenside bunker on the left and two deep bunkers on the right.
Tee Box Distances White 371 yds Blue 421 yds Yellow 371 yds Red 316 yds Green 316 yds -
Hole #17
 485 Yards - Par 5
Hole #17 is a visually stunning, downhill, par 5. Long hitters will have a chance at eagle from this front tee. This hole has it all: fairway bunkers, deep greenside pot bunker, forced carry over water, deep fescue rough and a challenging green. Again, this hole is all about the tee shot. Drive should be targeted over the fairway bunker on the left side of the fairway. If successfully executed, expect your drive to catch the downhill landing area and roll out to what could be a mid-iron approach shot and a chance at eagle. Drives missing the fairway right will encounter trouble, as the rough area will funnel the ball into the trees. A mid to short iron layup, will get you near the pond that protects the green. A solid wedge shot to the large, multi-tiered green is needed for a chance at birdie. The green is large, has a back to front slope, and is a tough read.
Tee Box Distances White 528 yds Blue 485 yds Yellow 485 yds Red 384 yds Green 384 yds -
Hole #18
 387 Yards - Par 4
The closing hole is challenging dog leg left, that requires a good drive and an accurate approach. Long hitters can attempt to cut the corner of the dogleg by going over the trees on the left. If you can hit it high, let it fly and bite off as much as you can. A solid mid to short iron approach shot is required to carry the green. Shots that come up short, will be rejected by the steep front on this elevated green. A deep bunker protects this green on the right side and misses left will require a delicate uphill chip to an undulating green.
Tee Box Distances White 387 yds Blue 485 yds Yellow 361 yds Red 361 yds Green 361 yds